Translate

Wednesday 27 February 2013

Regañás - The Daring Bakers February 2013 Challenge: Crisp Crackers and Flat Breads

Sarah from All Our Fingers in the Pie was our February 2013 Daring Bakers’ host and she challenges us to use our creativity in making our own Crisp Flatbreads and Crackers!Smile  


The February Daring Bakers' challenge was to make either a flatbread or cracker, no soft breads were allowed, just crunchy crispy! The good thing was we could use any flour we wanted, make them in any shape and add any seeds or spices we like!
My first idea was to make Italian grissini, they are after all crispy bread sticks, not flat but it did stick to the rules. But after thinking it over for a while I changed my mind. Why would I go all the way to Italian food when here in my own country we have a delicious, crispy and full of flavour flatbread! Yes we do, and they're called Regañás!
Eventhough Regañás are traditionally from the south of Spain (from Cordoba to be exact) they can be found in every supermarket all over the country. They are great to have during the "aperitivo" with some serrano ham and manchego cheese.

So without hesitation I began to search for a good recipe, and here is the result!
They're so crispy and delicious, way better than store bought, and everyone at home was raving about how great they were! So I guess from now on I will make my own!
Thanks Sarah for such a fun challenge, I had a great time! I'm looking forward for the next one!

El reto para el mes de febrero de The Daring Baker's era crear o bien un pan fino y crujiente o una galletita salada, los panes suaves y esponjosos no estaban permitidos solamente los crujientes. Lo bueno era que teniamos total libertad para utilizar cualquier tipo de harina, y se podian hacer en la forma que más nos gustase y  añadir las semillas o especias que más nos apeteciesen!
Lo primero que se me ocurrió fue hacer unos grissini italianos, no dejan de ser un tipo de pan crujiente, no era plano como una galletita pero cumplía los requisitos. Pero después de darle vueltas al asunto, cambié de opinión. Porqué hacer algo típico de la comida italiana cuando aquí en mi propio país tenemos un pan, fino, crujiente y realmente sabroso! Sí lo tenemos, y se llaman Regañás!
Las Regañás tienen su origen en el sur de España (de Cordoba para ser exactos), pero se pueden encontrar en cualquier supermercado de la Península. Son perfectas para tomar en el aperitivo con un poco de jamón serrano o de queso manchego.

Así pues, sin pensarmelo me puse a la búsqueda de una buena receta, y aquí está el resultado!
Son riquísimas y muy crujientes, mil veces mejor que las de los supermercados, y en casa gustó tanto que fueron todo un éxito! Deduzco que de ahora en adelante me limitaré a hacerlas en vez de comprarlas!
Gracias Sarah por un reto tan divertido, me ha encantado! Estoy deseando empezar el siguiente!

Ingredients:

400 grs all purpose flour
50 grs white wine
75 grs cold water
100 grs olive oil
7 grs salt
7 grs sesame seeds

Ingredientes:

400 grs harina normal
50 grs vino blanco
75 grs agua fria
100 grs aceite de oliva
7 grs sal
7 grs semillas de sésamo o ajonjolí


Directions:

Preheat the oven at 180ºC.

Modo de empleo:

Precalienta el horno a 180ºC.

First put the flour in a mixing bowl, make a hole in the middle and add all of the remaining ingredients.

Primero pon la harina en un ból y forma un agujero en el centro para poder echar ahi todos los ingredientes restantes. 
Start mixing all the ingredients first with the help of a spoon or a fork, once it's all well mixed knead the dough and make it into the shape of a smooth ball.

Para empezar mezcla todos los ingredientes con la ayuda de una cuchara o un tenedor, una vez esté todo bien mezclado amasalo a mano hasta que se forme una bola firme.

Wrap it in saran foil and leave it in the fridge for 2 hours or overnight, this will help increase the flavour of the ingredients.

Envuélvelo en film de cocina y déjalo reposar en la nevera unas 2 horas o sino toda una noche, esto mejorará el sabor.

Cut the dough in half and roll it out over a floured surface.

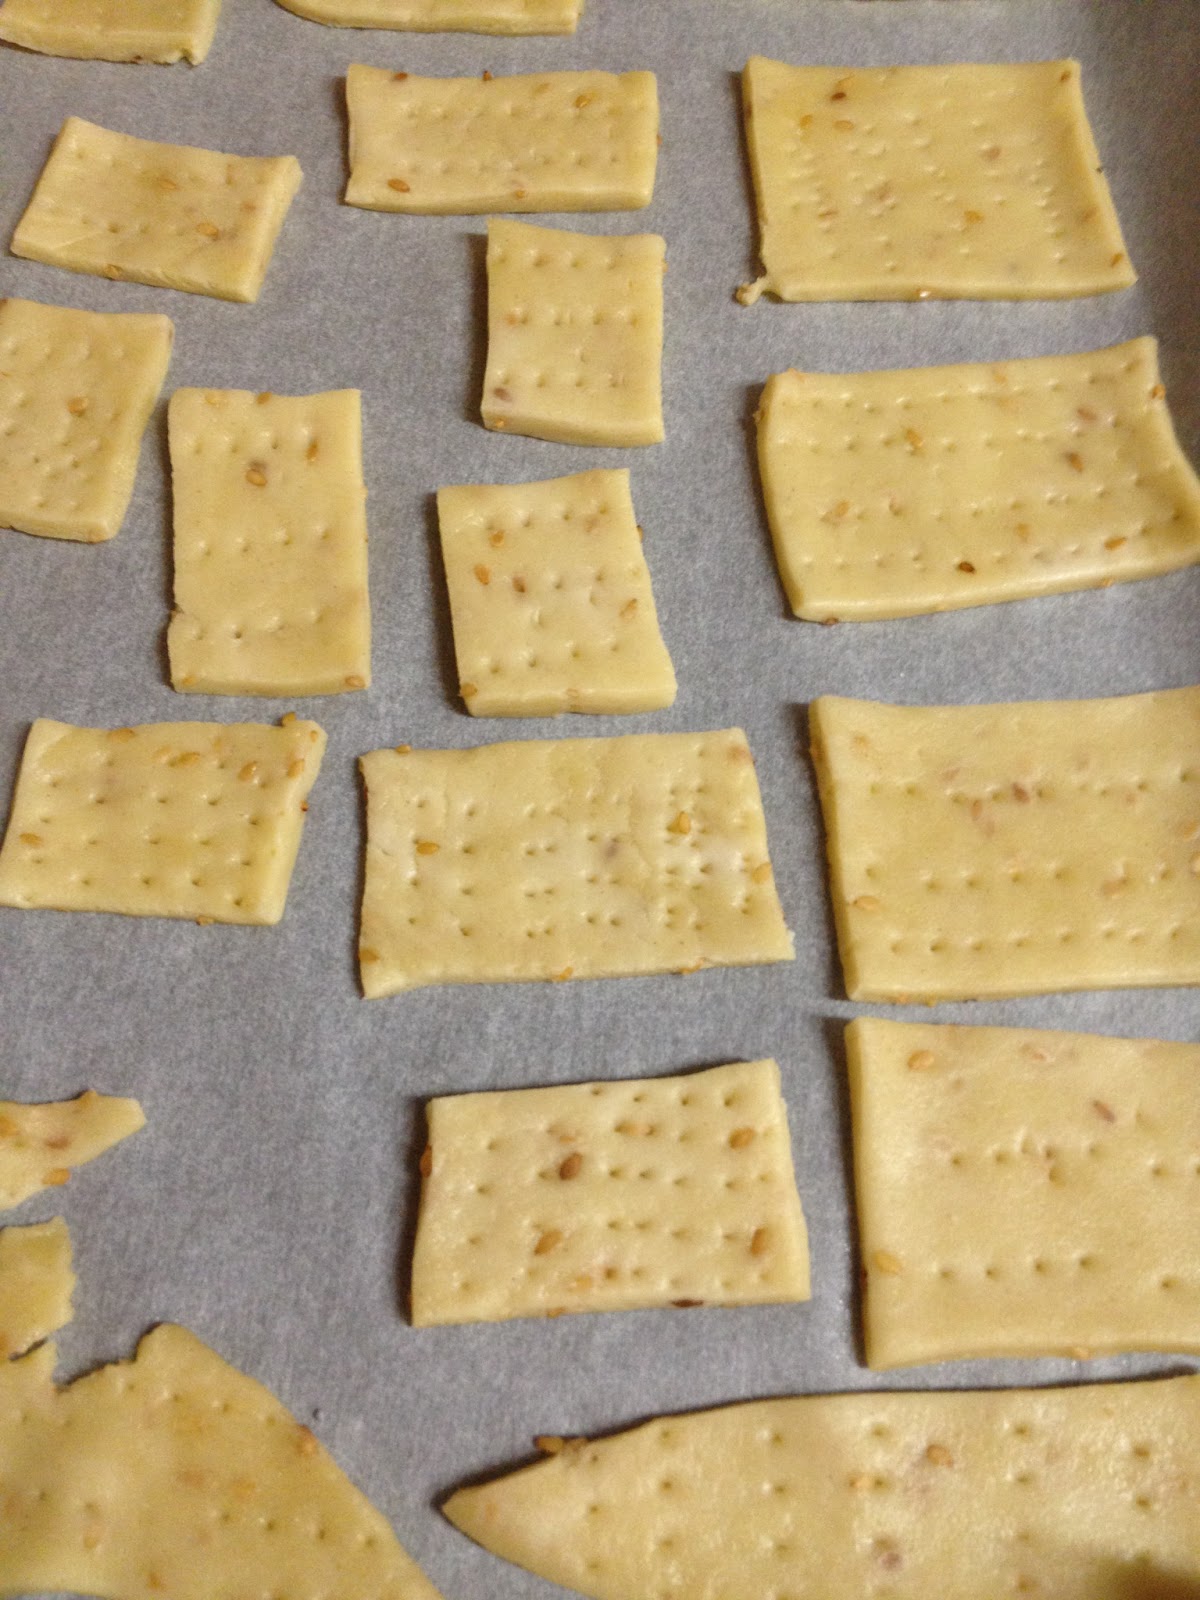
Corta la masa por la mitad y estirala sobre una superficie enharinada.


Make it 2 or 3 mm thick. Cut it into 5cm x 10cm rectangles and place them on a baking sheet.

La masa deberia tener unos 2 ó 3mm de grosor. Córtala en rectángulos de 5cm x 10cm y coloca las regañás sobre papel para hornear.

 Make some holes in them so they don't blow up while they're baking in the oven.

Haced unos agujeros para que nos e hinchen mientras se están horneando.


 Bake for 25 to 30 minutes, or until golden brown.

Hornear 25 a 30 minutos o hasta que estén bien doraditos.


 Et voilá!

Monday 18 February 2013

Rich Chocolate Marquise For a Sunday Family Lunch- Marquesa de Chocolate Para Una Comida de Domingo en Familia


Put your hand up if you spend Sunday's having lunch with your family or your in laws!
Some love it, and others hate it. In any case the best you can do to get through it is by enjoying a delicious Sunday lunch dessert!
The French are experts, and have a wide selection of traditional Sunday lunch desserts, what they call "Gâteau du dimanche". A great example is this Chocolate Marquise we had last Sunday using cheap ingredients we all have in our pantry.

Que levante la mano el que pasa los domingos comiendo en casa de su familia o de sus suegros!
Mientras unos lo detestan a otros les encanta. En cualquier caso la mejor mañera para sobrellevarlo es disfrutando de un delicioso postre!
Los Franceses son expertos en esta materia, y tienen una amplia selección de postres típicos de domingo, lo que ellos llaman "Gâteau du dimanche". Un buen ejemplo es esta Marquesa de Chocolate que tomamos el pasado domingo utilizando ingredientes asequibles que todos tenemos en la despensa.


Ingredients:
3 eggs
50 grs sugar
150 grs good quality dark chocolate
125 grs butter
1 1/2 gelatin sheets
1 teaspoon vanilla extract

Directions:
Put the gelatin sheets in a bowl with cold water.
Beat the eggs and sugar for 6 minutes.
Meanwhile melt the chocolate in a heat proof bowl. Once the chocolate is melted add the butter and stir until well incorporated. Finally add the gelatin sheets and the vanilla extract, again stir until well combined.
Add the chocolate mixture into the egg mixture and beat well for 2 minutes.
Put the batter into a long cake mold (previously covered with saran wrap) and leave to set in the fridge for at least 12 hours.
Once it's ready decorate it with white chocolate shavings and macarons (if you have any leftover like we did at home).
Et voilá!


Ingredientes:
3 huevos
50 grs azúcar
150 grs chocolate negro de buena calidad
125 grs mantequilla
1 1/2 hojas de gelatina
1 cucharadita extracto de vainilla

Modo de empleo:
Pon a remojo las hojas de gelatina en un ból con agua fría.
Bate los huevos y el azúcar durante 6 minutos.
Mientras derrite el chocolate al baño maría. Una vez derretido añade la mantequilla y mezcla hasta que se haya incorporado bien. Finalmente añade las hojas de gelatina y el extracto de vainilla a la mezcla del chocolate, y remuévelo bien hasta que esté totalmente incorporado.
Vierte la mezcla del chocolate a la de los huevos y el azúcar y vuelve a batir unos 2 minutos.
Pon la masa en un molde alargado de cake (previamente envuelto en film de cocina) y déjalo reposar en la nevera al menos 12 horas.
Una vez listo puedes decorarlo con lascas de chocolate blanco y macarons (si es que tienes restos cómo fue nuestro caso en casa).
Et voilá! 

Saturday 16 February 2013

Carnival Elephant Ears - Orejas de Carnaval


Every holiday has it's traditional dessert; in Spain for Carnival you'll always find "Elephant Ears" in almost every pastry shop. They're crunchy, sweet and have a delicious taste of lemon and anise!
They're really easy to make, so go ahead and give it a try!

Cada fiesta tiene su postre típico; durante los Carnavales en España podrás encontrar en cada pasteleria las "Orejas de Carnaval". Son crujientes, dulces y tienen un delicioso sabor a limón y anís!
Son realmente fáciles de hacer, asique anímate y prueba a hacerlos!


First you need to make the dough:

Primero necesitaras hacer la masa:

Ingredients:
100 ml water
80 grs butter (melted)
1 egg
75 ml anise
1 teaspoon lemon zest
425 grs bread flour
Pinch of salt

Ingredientes:
100 ml agua
80 grs mantequilla derretida
1 huevo
75 ml anís
1 cucharadita ralladura de limón
425 grs harina de fuerza
Pizca de Sal

Mix all of the ingredients and knead until you have a smooth ball. Wrap it and refrigerate for 2 hours or overnight, this will make it taste better.

Mezcla todos los ingredientes hasta formar una bola firme. Envuelvelo en film de cocina y déjalo enfriar en la nevera durante 2 horas o toda la noche, esto mejorará el sabor.

Cut the dough into 2cm wide slices; spread a bit of olive oil over the surface where you'll roll it out.

Corta la masa en lonchas de 2cm de grosor; pon un poco de aceite de oliva sobre la superficie en la que vayas a extender la masa.


Use a pastry cutter to make the shape you want them to be, and fry them in warm olive or vegetable oil.

Utiliza un cortador de pastas para cortarlo de la forma que prefieras, y se fríe en aceite de oliva o vegetal caliente.


While you're frying them, use tongs to get the shape of the ear.

Una vez lo estés friendo, haz la forma de la oreja con la ayuda de unas pinzas de cocina.


Sprinkle some sugar over them (feel free to add cinnamon or honey).

Espolvorea un poco de azúcar sobre ellas (puedes ponerles también canela o miel).


Et voilá!


Wednesday 6 February 2013

Mission Perfect Macaron Part 2 (both sweet and savory) - Misión Macaron Perfecto Parte 2 (tanto dulce cómo salado)


So here we are back again on our mission of creating THE Perfect Macaron, and let me update you that we're almost getting there, we're soooooo close to it!!

Let's make a recap; on the last post I explained what were the main facts a perfect macaron must have (foot, shape, crunchy outside, chewy inside etc...). Well after researching we've discovering a few more important facts:
  • The egg whites: No store bought (don't be lazy and crack the eggs yourself!). It's better if you separate the egg yolks from the whites at home; preferrably from non fresh eggs (not old eggs that have been over a month in your fridge!). But eggs that haven't been just bought, maybe 1 or 2 days old (aproximately). Also, REALLY IMPORTANT, two days before you make the macarons, separate the egg whites from the yolks and leave them in a bowl in the fridge (cover it well!). Now, the night before you make them take the egg whites out of the fridge and leave it overnight in the kitchen at room temperature. Don't be scared or worried about this, because this is how REAL macarons are made, every single french pastry chef does it, so if they do it, we too!
  •  Food coloring:  It's best if you use either food coloring in gel or powdered dust. The results will be fantastic!
  • Temperature: 150ºC upper and lower heat without the fan on, and bake for 17 minutes. Anyway I suggest you keep an eye, you don't want these little babies to burn!
  • Piping tip: After trying with different sizes, we've found out the best for macarons is the tip number 6. The shell won't be too small neither too big, just the perfect bite size. However you're always welcome to pipe them bigger or smaller or even with shapes! 
  •  Meringue: The best meringue for macarons is the italian. So you need to make a syrup: boil 50grs water with 150 grs sugar, and let it reach 100ºC. Once it's at this temperature add it to the egg whites (while they are beating).

Bueno aquí estamos de nuevo en nuestra misión de crear el Macaron Perfecto, y dejadme que os diga que estamos muuuuuuyyyy cerca de conseguir nuestro objetivo!

Vamos a hacer un resumen, en el último post expliqué qué debía tener un macaron para ser perfecto (el pie, la forma, la cáscara exterior debía ser crujiente, el interior tenía que ser blandito y cremoso etc...). Bueno tras investigar un poco más hemos descubierto unos cuantos factores importantes:
  • La clara del huevo: Nada de las pasteurizadas que venden en el supermercado (no seáis vagos y cascar los huevos vosotros mismos!). Es mejor si tú mismo separas la yema de la clara en casa; preferiblemente de huevos que no sean frescos (ni se os ocurra utilizar huevos que llevan más de un mes en vuestra nevera!). Pero huevos que no sean recién comprados, que tengan 1 ó 2 días de antigüedad (aproximadamente). También, MUY IMPORTANTE, 2 días antes de hacer los macarons, separa la clara de la yema y lo conservas en un ból en la nevera (bien tapadito!). Entonces, la víspera de hacer los macarons, saca las claras de la nevera y déjalos en la cocina, a temperatura ambiente. No os asustéis por esto, ya que es así como se hacen los VERDADEROS macarons, todos los pasteleros franceses lo hacen así, por lo que si ellos lo hacen nosotros también!
  • Colorante alimentario: Para obtener los mejores resultados es preferible utilizar colorante en polvo o bien en gel.
  • Temperatura: Tener el horno a 150ºC con calor arriba y abajo y sin el ventilador, y cocinar durante 17 minutos. De todos modos el preferible estar atentos al horno para que no se os quemen estos pequeñines!
  • Boquilla: Tras probar varias boquillas de distintos tamaños, hemos descubierto que la mejor es la del número 6. El tamaño de la cáscara no será ni muy grande ni muy pequeño, el tamaño perfecto para comertelo de un bocado. Aunque siempre los puedes hacer del tamaño que más te guste, incluso hacerlos con formas!
  • Merengue: El mejor tipo de merengue para hacer los macarons es el italiano. Primero debes hacer un almíbar con 50 grs de agua y 150 grs de azucar, lo hierves hasta que alcance 100ºC de temperatura. Una vez alcazada la temperatura lo incorporas muy despacito a las claras (mientras se están batiendo).
Et voilá, this is the result of our second try with macarons! We painted the sweet ones with a bit of food coloring to make them more personal and give them a fun and minimalist look!

Et voilá, éste es el resultado de nuestro segundo intento con los macarons! Los dulces los pintamos con un poco de colorante alimentario para hacerlos más personales y darles un toque divertido y minimalista!


The sweet macaron: filled with a Nestle praliné chocolate ganache (sadly this chocolate can only be found in France).

El macaron dulce: relleno de una ganache de chocolate praliné de Nestle (lamentablemente esta tableta solo se puede comprar en Francia).


The savory macaron: topped with poppy and sesame seeds and filled with foie gras.

El macaron salado: cubierto por semillas de sésamo y amapola y relleno de foie gras.


We added these seeds, but feel free to decorate your macarons any way you like!

Nosotras añadimos estas semillas, pero los puedes decorar de la manera que más te guste!

The recipe? We'll post it soon very soon, just let us perfection a few small details, and you'll be free to enjoy the most perfect macarons you've ever had in your life!

¿La receta? Pronto muy pronto la publicaremos, dejadnos que perfeccionemos unos detallitos y podréis disfrutar de los mejores macarons que hayáis probado nunca!

Monday 4 February 2013

Maple Bacon Cupcakes With Maple Creamcheese Frosting - Cupcakes de Bacon y Sirope de Arce


Bacon? In a cupcake? This time she really has lost it!
NO! I haven't gone mad at all, this is by far one of the best cupcakes I've ever made and eaten.
You must be wondering how I came up with the idea of making a sweet and savory cupcake? Well the answer is "Man vs Food"! Yes the tv show!
About 3 years ago I was watching an episode where Adam Richman visited the Voodoo Donuts store in Portland, Oregon; this donut shop is famous for their maple bacon donut.
The moment I saw that donut I completely fell in love! I needed to eat that donut, or make one similar to it. But suddenly an idea popped in my head..."If there are maple bacon donuts, why not make a maple bacon cupcake? Yes that's it, I need to make it"!
So immediately my search for the best maple bacon cupcake began, and to my surprise there were a huge number of great recipes out there, but none of them convinced me.
Finally several months ago when I had almost lost my hope I found this fantastic recipe, and what's more important, it had great reviews!
But of course there had to be a problem, Pure Maple Extract was the name of that problem. The recipe said that the batter needed to have this extract and it couldn't be changed with Pure Maple Syrup.
Now where on earth was I going to find in Madrid (or Spain) a place where they sold it? I looked everywhere online, I even thought of buying it from Amazon; unfortunately it can't be shipped overseas. 
When I had almost given up, this last Christmas a miracle took place (yes a Christmas miracle, and I'm not crazy). A miracle in the shape of a little bottle with the words Arôme Érable (maple extract) written on it!
Who I need to thank for this miracle? Well the best culinary store in the world Le Meilleur du Chef. They have absolutely anything you need, every single extract you can imagine: from simple vanilla or mint to foie gras or lobster! And they're all fantastic, believe me!

¿Bacon? ¿En un cupcake? Ésta ha perdido el norte por completo! 
Pues NO! No me he vuelto loca, éste es a día de hoy uno de los mejores cupcakes que he comido.
¿Os preguntaréis cómo llegue a la idea de hace un cupcake tanto dulce como salado? Pues la respuesta es "Man Vs Food" (Crónicas Carnívoras)! Sí el programa de televisión!
Hará unos 3 años aproximadamente estaba viendo un capítulo en el que Adam Richman vistaba la pasteleria Voodoo Donuts en Portland, Oregon; esta pasteleria es famosa por su donut con bacon y sirope de arce. 
Me enamoré perdiamente el momento que ví ese donut! Necesitaba comer ese donut, o por lo menos hacer uno parecido. De repente una idea me pasó por la cabeza..."Si hay donuts de bacon con sirope de arce, ¿porqué no hacer un cupcake con bacon y jarabe de arce? Eso es, tengo que hacerlo"!
Inmediatamente me puse a la búsqueda del mejor cupcake con bacon y jarabe de arce, y para mi sorpresa había un gran número de recetas, pero ninguna me convencía del todo.
Finalmente hace unos meses cuando casi habia perdido la esperanza encontré esta receta fabulosa, y lo que para mí es más importante, tení muy buenas críticas!
Pero había un problema, el nombre de ese problema era Extracto Puro de Sirope de Arce. La receta decía que la masa debía llevar este extracto y que no era posible sustituirlo por el sirope en sí.
Y ahora, ¿dónde demonios iba yo a encontrar en Madrid (o en España) una tienda dónde vendan este extracto? Miré online por todas partes, incluso se me ocurrió comprarlo por Amazon, pero tristemente no lo envian a paises fuera de Canadá o EE.UU.
Pero estas pasadas navidades, cuando ya casi me había dado por vencida, ocurrió un milagro (sí un milagro de la Navidad, y nó, no me he vuelto loca). Un milagro en forma de botellita con las palabras Arôme Érable
(extracto sirope de arce) escrito sobre ello! ¿A quién debo agradecer por este milagro? Pues a la mejor tienda culinaria del mundo mundial  Le Meilleur du Chef. Tienen de todo, cualquier cosa que necesites, todo tipo de extractos que puedas imaginar: desde los simples cómo el de vainilla o menta a los más complejos cómo foie gras o langosta! Y todos son fantásticos, hacedme caso!

Finally this last weekend I made the cupcakes, and this is the result!

Al fin este pasado fin de semana hice los cupcakes, y este es el resultado!

I topped it with a sweet maple cream cheese frosting, to die for!

Lo cubrí con un cream cheese frosting con un poquito del extracto de jarabe de arce, para morirse!

Ingredients:
8 - 10 strips of bacon
1 1/3 cup all purpose flour
2/3 cups Cake flour (not self-rising)
2 teaspoons baking powder
1/4 teaspoon salt
213 grs butter (room temperature)
13 grs bacon drippings (cooled and solidified)
2 cups sugar
3 eggs
1 cup milk (room temperature)
2 teaspoons vanilla extract
2 teaspoons maple extract

Directions:
Preheat oven at 190ºC.
Bake the bacon until crisp brown in the oven, set aside and keep the bacon drippings until they solidify (it will go into the cake batter). Dice the bacon.
Lower the heat to 175ºC.
In a medium bowl combine flours, baking powder and salt; set aside. In the bowl of a stand mixer fitted with the paddle attachment, cream the butter, the bacon drippings and sugar for 5 minutes until light and fluffy.
Add the eggs one at a time. Slowly add the dry ingredients and milk in 2 alternating batches. Then add the vanilla and maple extract and finally stir in the diced bacon.
Scoop batter into the pan and bake for 22 minutes.

Maple cream cheese frosting:
250 grs cream cheese
250 grs butter
2 teaspoons maple extract
500 grs icing sugar

Ingredientes:
8 - 10 tiras de bacon
1 1/3 tazas harina normal
2/3 harina especial reposteria (no la que lleva levadura)
2 cucharaditas de levadura
1/4 cucharadita de sal
213 grs mantequilla (a temperatura ambiente
13 grs grasa del bacon solidificada
2 tazas de azúcar
3 huevos
1 taza de leche (a temperatura ambiente)
2 cucharaditas de extracto de vainilla
2 cucharaditas de extracto de sirope de arce

Modo de empleo:
Precalentar el horno a 190ºC
Cocinar el bacon en el horno hasta que esté bien doradito y crujiente, trocearlo y dejarlo a un lado. Guardar la grasa que haya soltado el bacon y dejar enfriar (se incorporará en la masa del bizcocho).
Bajar la temperatura a 175ºC.
En un ból mediano mezclar las harinas (tamizadas, claro), la levadura y la sal; dejar a un lado. En el ból de la batidora (con la herramienta que es cómo una pala), mezclar la mantequilla. la grasa del bacon solidificada y el azúcar durante 5 minutos hasta que quede una masa cremosa y ligera.
Añadir los huevos de uno en uno. Poco a poco incoporar los ingredientes secos junto con la leche en 2 tandas. Luego se añade la vanilla y el extracto de arce. Finalmente incorporar el bacon troceado.
Poner la masa en el molder y cocinar unos 22 minutos.

Maple Cream cheese frosting:  
250 grs queso crema
250 grs mantequilla
2 cucharaditas extracto de arce
500 grs azúcar glaçé